|
Chroma key basics:
Here's how I go about a
simple chroma key (green screen) composite. Each compositing program
has different terms for the processes and tools I'm going to talk
about. Therefore, this is meant to be a general overview, not a
program specific tutorial. So, don't ask me
how to do “such and such” with program
“X”, because I don't
know how and your program may not even be able to do it.
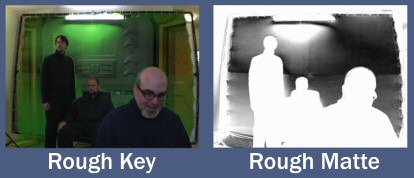
A good program will allow
you to view the matte (or Alpha Channel as it's sometimes called). It's
often easier to spot problems with the matte if you are able to
view it directly. Even if your program doesn't allow you to see it,
it's still generating a matte internally.
We start with two images:
a background (BG) image and a foreground image (FG).
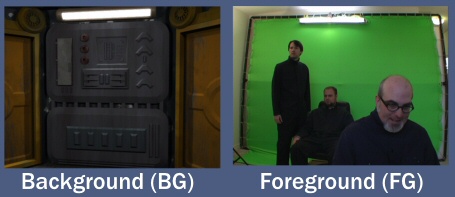
The FG is
placed in
front of the BG. At this point, the FG completely hides the BG,
because we have not made a matte for the FG yet. Chroma keying is a
method of creating a matte from a specific colour (in this case the
green screen). First we tell the computer which colour we want to
make transparent (allowing us to see the background through it).
The green screen is never
perfectly lit, so some tolerance ranges have to be adjusted to let
more of the green become transparent. You can see here what
happens if the tolerances aren't set right. Parts you want to
keep
start going transparent.

Keep tweaking the settings until you get
the best possible result. Don't worry if there is still a green
outline around the FG subject (it's bound to happen 99% of the
time). There are other tools that will take care of this.

A Note On Colour Space:
First of all, if you don't
know anything about colour space, you may want to check THIS out.
Most low end compositing
programs work in RGB (red, green, blue) colour space. Unfortunately,
in my experience, this is the worse colour space to work in. Why? Think
of it this way; The three controls you have over the key are
Red, Green and Blue. Assuming you've shot a perfectly lit and
exposed green screen (even though this never happens!), then what
good are the Red and Blue controls on your chroma key? Basically,
two thirds of the controls don't help you refine your key.
Now think of the same
thing in HLS (Hue, Luminance, Saturation) colour space. Once you
pick the colour (Hue) of the key, in this case green, you can then
hone in on the luminance of that green AND the saturation of that
green. Now all three of your controls are helping you refine the key.
If you're working with
MiniDV footage, then it makes even more sense to work in YUV, as that
is the native colour space of that format.
If your compositing
program allows it, work in any other colour space than RGB. If
you're stuck with RGB, it's sometimes better to colour correct your
green screen footage before you try to pull a key off it. This may
make your subject look awful, but puts the green of your screen more
in the “zone” your keyer likes. You then have to
take the matte
this generates and apply it to an uncolour corrected version of the
FG. This is more complicated, but can produce much better results.
Shrinking (or choking) the
matte does what it sounds like. It makes the matte smaller and will
help remove green outlines. The catch is, the more you shrink the
matte, the more fine details are lost (such as strands of hair). If
you go too far, people can lose their hands or even their heads! A
good program will allow you to adjust the gamma, erosion, blur,
histogram, etc. of the matte as well.

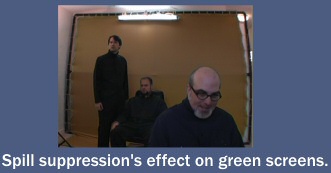
Next we have to deal with
something called Spill. That's when light reflected off the green
screen falls onto your subject, turning it green. This is why it's
important to keep your subject as far away from the green screen as
possible. The farther away they are, the less spill will hit them.
You can see below how the actor's skin is reflecting some green. The way
to get rid of it is to use Spill Suppression. Most el cheap-o
compositing programs don't have this tool. Too bad, 'cause it makes
your composites look a lot better. It basically allows you to colour
correct just the green.
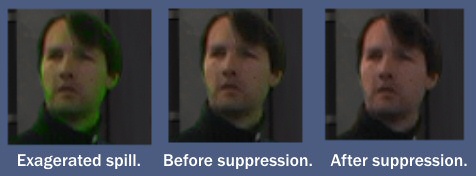
You can see what it does
here. I've not only suppressed the green, I've also swung it towards
flesh tone, because I was most concerned about what it was doing to
peoples' faces. Wispy hair is something else that benefits greatly
from Spill Suppression.
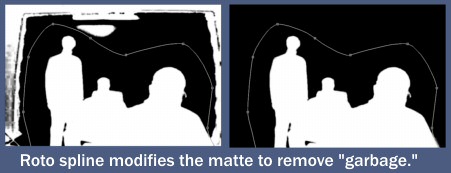
So, we're almost done. All we have to do is get rid off all that crap
outside of the green
screen. This is accomplished with a Garbage Matte. Here I have
created the garbage matte using a roto spline (a hand drawn shape).
When it's turned on, everything outside the shape becomes transparent
regardless of what my chroma key says. Some programs may refer to this as a Mask.
Here's the final
composite.
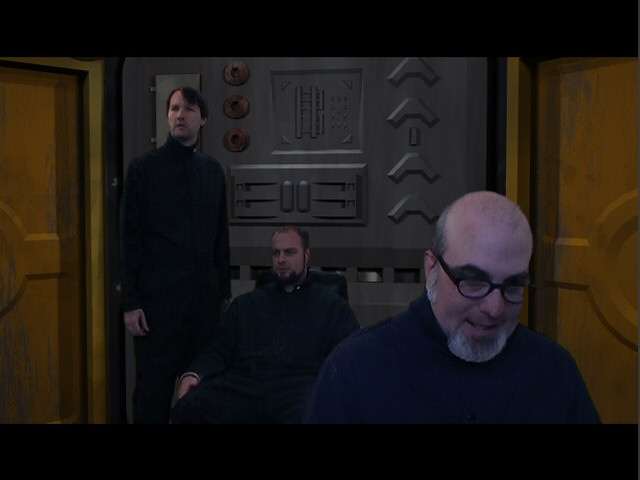
A colour correction has
been applied to the foreground to make it better match the BG
environment.
A letterbox has also been
applied. I like to shoot full frame and then add the letterbox in
post. When working with virtual sets it can be hard to know at the
time you're shooting if you have the shot lined up exactly right.
Having extra image outside the letterbox allows me to adjust the
composition. In this case, I actually moved the shot up a bit to
reduce some of the headroom. The letterbox then hides the gap left
at the bottom of the frame.
There, all done!
However... Just because a still image looks good, doesn't mean the
moving footage will be acceptable. MiniDV has a lot of compression
and this can cause noise (or bubbling) on the edge of your mattes.
This is often not apparent until you see the footage in motion.
If you have noise in your
matte, go back and tweak all the settings until it goes away.
Shrinking or choking the matte helps, but remember if you go too far,
people start losing their body parts!
Sometimes applying a blur
to the shot before the key is pulled will help. But of course, you
will then have a blurred shot. Use the matte pulled from the blurred
shot, but apply it to a non-blurred version.
Return to Top
|